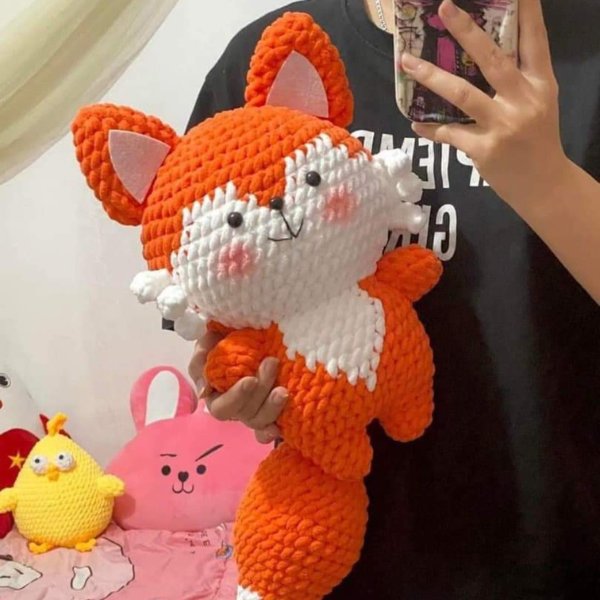
There’s something magical about creating something from scratch, especially when it’s a cute and cuddly crochet animal. Today, we’re diving into the world of crochet with a charming project: the Red Fox. This guide will walk you through the process step-by-step, so you can craft your very own adorable red fox crochet pattern.
How to create Red Fox Crochet Pattern

Crochet is not only a relaxing hobby but also a fantastic way to produce personalized gifts and home décor. Red Fox Crochet Pattern is suitable for crocheters with experience in basic stitches and amigurumi techniques. You can adjust the size of the fox by using different yarn weights and crochet hook sizes.
Materials
Choosing the right yarn is crucial for your red fox crochet project. Opt for a soft, medium-weight yarn in shades of red, white, and black. These colors will bring your fox to life and ensure it looks just like the real thing. Acrylic yarn is a popular choice because it’s durable, easy to work with, and comes in a wide variety of colors.
For this project, a 4.0mm (G) crochet hook is recommended. This size works well with medium-weight yarn and will help you achieve the perfect stitch size for your red fox.
- Red yarn (worsted weight)
- White yarn (worsted weight)
- Black yarn (worsted weight)
- Small amount of orange yarn (worsted weight)
- Crochet hook (size suitable for your yarn weight)
- Stuffing
- Tapestry needle
- Black embroidery floss (optional, for eyes)
- Safety eyes (optional)
Abbreviations:
- sc – single crochet
- inc – increase (2 sc in one stitch)
- dec – decrease (sc two stitches together)
- ch – chain
- sl st – slip stitch
- sc inc – single crochet increase (sc in each of the next two stitches)
- sc dec – single crochet decrease (sc two stitches together)
- BLO – back loop only
- FLO – front loop only
See more crochet patterm: Star Capybara Keychain Crochet Pattern
Chart Instructions
Leg:
- R1: MR 6x
- R2:
- R2: 1X, 1V)*3=9
- R3: 9X 1st leg: Cut the wool 2nd leg: Do not cut the wool but go up 3ch, connect with the 1st leg and continue hooking onto the body.
- R4: 9X 1st pin, 3X into 3ch, 9X 2nd pin, 3X into 3ch = 24
- R5: (3X, 1V)*630
- R6: (2X, 1V, 2X)*6=36
- R7: 36X
- Note: Bold and underlined lettering is crocheted with white wool
- R8: 16X, 1X, 19X
- R9: 15X, 3X, 18X
- R10: 14X, 5X, 17X
- R11: 13X, 7X, 16X
- R12: 12X, 9X, 15X
- R13: (2X, 1A, 2X)2, 2, 1A,4X, 1A, (2X, 1A, 2X)2
- R14: 10X, 8X, 12X
Ears x2:
- R1: MR 6x
- R2: 3(x, v)
- R3: 3(2x, v)
- R4: 3(3x, v)
- R5-6: 15x
- R7: 3x, 2T, 2F, 1E, 1F, 2T, 3X
- Cut and leave the yarn for sewing
Hand:
- R1: MR 6x
- R2: 3(x, v)
- R3-4: 9x
Head:
- R1: MR 6x
- R2: 6v
- R3: 6(x, v)
- R4: 6(2x, v)
- R5: 6(3x, v)
- R6: 6(4x, v)
- R7: 6(5x, v)
- R8: 6(6x, v)
- R9: 6(7x, v)
- Note: Bold and underlined lettering is crocheted with white wool
- R10: 20x, 5x, 4x, 5x, 20x
- R11: 19x, 7x, 2x, 7x, 19x
- R12: 17x, 20x, 17x
- R13-15: 15x, 24x, 15x
- R16: 7x, a, 7x, a, 2(7x, a), 2x, 5x, a, 7x, a
- R17: 3x, a, x, a, 2x, x, 4(4x, a), 2x, a, 6x, a, 3x
- R18: (5x, a)*2, (5x, a)*2, x, 4x, a, 5x, a
- R19: (4x, a)*2, x, x, a, 4x, a, 2x, (4x, a)*2
Tail (white wool):
- R1: MR 4x
- R2: 2(x, v)
- R3: 3(x, v)
- R4: 3(2x, v)
- R5: 12x
- R6: 3(3x, v)
- Change to orange wool
- R7: 3(4x, v)
- R8: 3(5x, v)
- R9: 3(6x, v)
- R10: 3(7x, v)
- R11-15: 27x
- R16: 3(7x, a)
- R17: 24x
- R18: 3(4x, a)
- R19: 21x
- R20: 3(5x, a)
- R21: 3(4x, a)
- R22: 3(3x, a)
- R23: 12x
- R24: 3(2x, a)
- R25: 9x
- R26: 3(x, a)
Beard on both cheeks (white wool):
- R1: 5ch, hooked on the 2nd leg from the tip of the 4x needle
- R2: 6ch, hooked on the 2nd leg from the tip of the 5x needle
- R3: 5ch, hook on the 2nd leg from the tip of the 4x needle
This is a basic pattern, and you can customize it in many ways! To finish crocheting, you need to weave in any remaining yarn ends and make sure all parts are securely attached. This pattern is a great base to customize!
Enjoy your crochet project! In addition, you can refer to many other crochet patterns from Fanycrafts at the All Crochet Patterns blog.
Conclusion
Creating a red fox crochet pattern is a rewarding project that results in a charming, handmade toy. By following these steps and practicing your crochet skills, you can craft a delightful fox that will bring joy to anyone who sees it. Don’t be afraid to experiment and make the pattern your own!