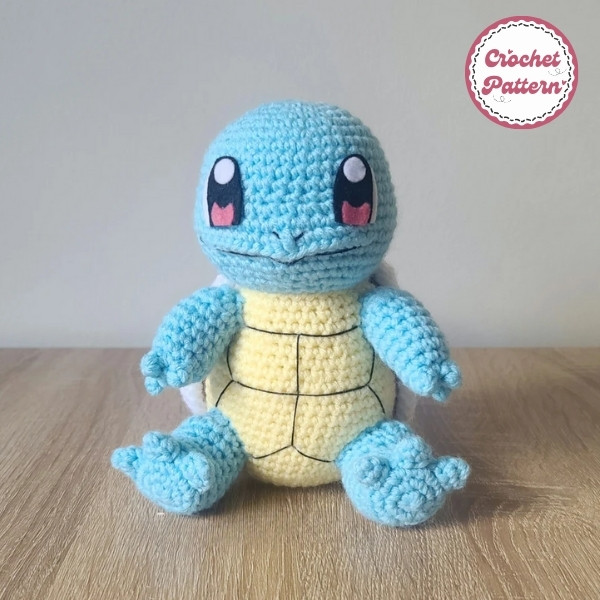
Creating a Squirtle crochet pattern is a fantastic project for any Pokémon fan and an enjoyable challenge for crochet enthusiasts. Squirtle, the beloved water-type Pokémon, brings a mix of adorable details—like its shell, tiny limbs, and signature wide-eyed expression—that are fun to capture in crochet form. In this guide, we’ll break down the steps for making your very own Squirtle amigurumi with tips, tricks, and techniques for a polished result.
How to create Squirtle Crochet Pattern

Crafting a Squirtle crochet pattern can seem challenging, but with the right approach, it becomes manageable and rewarding. This step-by-step guide will walk you through creating each part of Squirtle, from its head to its tail, with clear directions and helpful tips along the way. Let’s start by gathering everything you’ll need for this project.
Materirals Need
To replicate Squirtle’s appearance, choose:
- Light Blue Yarn for the body
- Brown and Tan Yarn for the shell
- White and Black Yarn for details on the face and shell
A smaller hook (2.5 mm or 3 mm) is recommended for a tight, neat amigurumi look that will hold its shape well.
Safety Eyes and Additional Accessories:
- 6-8 mm safety eyes for Squirtle’s large, expressive eyes
- Stitch markers to help keep track of rows
- Fiberfill stuffing to keep your Squirtle plush and cuddly
Familiarity with basic stitches, especially the magic ring, single crochet (sc), increase (inc), and decrease (dec), will make this project easier to complete.
Mastering amigurumi basics, such as working in the round and using stitch markers, will help in achieving a smooth and even appearance.
Read more: Ninja Bunny Crochet Pattern
Chart Instructions Squirtle Crochet Pattern

Body:
- MR: Ch 2, SL ST in the first ch to form a ring.
- R1: 6 SC in MR (6)
- R2: INC in each ST around (12)
- R3: SC, INC repeat around (18)
- R4-7: SC in each ST around (18)
- R8: DEC, SC repeat around (12)
- R9: DEC in each ST around (6)
- Stuff the body firmly and FO, leaving a small opening. Sew the opening closed.
Shell:
- MR: Ch 2, SL ST in the first ch to form a ring.
- R1: 6 SC in MR (6)
- R2: INC in each ST around (12)
- R3: SC, INC repeat around (18)
- R4-5: SC in each ST around (18)
- R6: DEC, SC repeat around (12)
- R7: DEC in each ST around (6)
- Stuff the shell lightly and FO, leaving a small opening. Sew the opening closed.
Head:
- MR: Ch 2, SL ST in the first ch to form a ring.
- R1: 6 SC in MR (6)
- R2: INC in each ST around (12)
- R3: SC, INC repeat around (18)
- R4-5: SC in each ST around (18)
- R6: DEC, SC repeat around (12)
- R7: DEC in each ST around (6)
- Stuff the head firmly and FO, leaving a small opening. Sew the opening closed.
Tail:
- MR: Ch 2, SL ST in the first ch to form a ring.
- R1: 6 SC in MR (6)
- R2: INC in each ST around (12)
- R3-4: SC in each ST around (12)
- Stuff the tail lightly and FO, leaving a small opening. Sew the opening closed.
Arms (Make 2):
- MR: Ch 2, SL ST in the first ch to form a ring.
- R1: 6 SC in MR (6)
- R2: INC in each ST around (12)
- R3-4: SC in each ST around (12)
- Stuff the arm firmly and FO, leaving a small opening. Sew the opening closed.
Legs (Make 2):
- MR: Ch 2, SL ST in the first ch to form a ring.
- R1: 6 SC in MR (6)
- R2: INC in each ST around (12)
- R3-5: SC in each ST around (12)
- Stuff the leg firmly and FO, leaving a small opening. Sew the opening closed.
Assembly:
- Sew the head to the body.
- Sew the shell to the back of the body.
- Sew the tail to the back of the body.
- Sew the arms to the sides of the body.
- Sew the legs to the bottom of the body.
Adding Details:
- Use white yarn to embroider eyes.
- Use dark blue yarn to embroider the mouth.
Customization:
- Use different colors of yarn to create unique Squirtle.
- Add accessories like a water gun or a Pokeball.
- Experiment with different stitches and techniques to create your own unique style.
Remember, crochet is a creative process. Don’t be afraid to experiment and have fun! If Squirtle’s parts look too large or too small, adjust hook size or yarn thickness accordingly. Keep a close eye on each round, using stitch markers to help track your progress and avoid mistakes.
Before starting the full project, practice creating simple shapes to get comfortable with the stitches. A smaller hook gives a denser, tighter finish, while a larger hook can make the stitches looser.
Remember, crochet is a creative process. Don’t be afraid to experiment and have fun! In addition, you can refer to many other crochet patterns from Fanycrafts at the All Crochet Patterns blog.
Conclusion
Creating a Squirtle crochet pattern is a delightful project that will leave you with an adorable Pokémon friend. Following these steps and practicing as you go will make the process enjoyable, even if you’re new to crochet. With patience and creativity, you’ll have a unique Squirtle to cherish or gift to a fellow Pokémon fan!