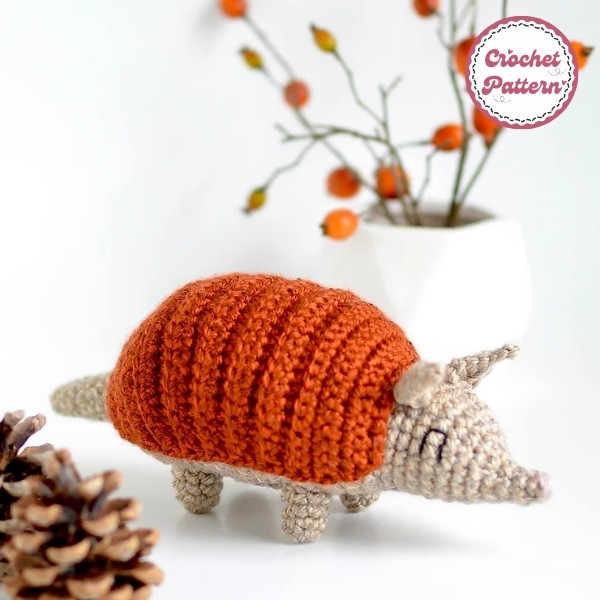
Fanycrafts welcomes our dear friends! Today, we will share with you a new lovely crochet pattern which is Armadillo Crochet Pattern. Creating an armadillo crochet pattern is an exciting project, whether you’re looking to add a unique touch to your amigurumi collection or are seeking a creative handmade gift idea. This guide will walk you through every step, from choosing the right yarn to adding those final armadillo details.
How to create Armadillo Crochet Pattern

Ever thought of crocheting an armadillo? This delightful project not only offers a fun challenge but also produces an adorable, unique creature that’s sure to turn heads. Plus, it’s the perfect way to expand your crochet skills!
Amigurumi, the art of crocheting small, stuffed yarn creatures, is an ideal craft for creating animal figures like armadillos. Before diving into your armadillo pattern, it’s helpful to be comfortable with basic amigurumi stitches and techniques. Here’s a basic crochet pattern for an armadillo. You can adjust the size and colors to your preference.
Here’s what you’ll need to get started:
- Yarn: Choose a soft yarn in shades of gray or brown for a realistic look.
- Crochet Hook: A smaller hook will help create tight stitches for a well-defined shape.
- Safety Eyes: Optional, but they add a charming finish.
- Tapestry Needle: For sewing pieces together.
- Polyester Stuffing: To bring your armadillo to life.
Opt for worsted or sport-weight yarn, as these weights are ideal for amigurumi. Pairing this yarn with a smaller hook—typically a size 3.5 mm or 4 mm—helps create tight, neat stitches.
To make your armadillo, you’ll use several foundational stitches:
- Single Crochet (sc): Essential for amigurumi projects.
- Magic Ring: Perfect for creating a seamless, rounded start.
- Increases and Decreases: Used to shape your pattern by adding or reducing stitches.
Abbreviations:
- beg = begin(ninig)
- ch = chain
- rep = repeat
- rnd(s) = round(s)
- sc = single crochet
- hdc = half double crochet
- dc = double crochet
- sl st = slip stitch
- st(s) = stitch(es)
Explore more crochet: Coraline Crochet Pattern
Chart Instructions Armadillo Crochet Pattern

Body:
- With A make a magic ring.
- R1: Work 5 sc in a ring.
- R2: Sc in next 4 sts, 2 sc in next one – 6 sc.
- R3: * sc in next 2 sts, 2 sc in next st; rep fro m twice – 8 sc.
- R4: 1 sc in each st around – 8 sc.
- R5: * sc in next 3 sts, 2 sc in next st; rep from * twice – 10 sc.
- R6: 1 sc in each st around – 10 sc.
- R7: * sc in next 4 sts, 2 sc in next st; rep from * twice – 12 sc.
- R8: 1 sc in each st around – 12 sc.
- R 9 – 10: 1 sc in each st around – 12 sc.
- R11: 1 sc in next 3 sts, 2 hdc in next 6 sts, 1 sc in next 3 sts – 18 sts.
- R12: 1 sc in next 3 sts, * 1 hdc in next 2 sts, 2 hdc in next st; rep from * 4 times, 1 sc in next 3 sts – 22 sts.
- R13: 1 sc in next 3 sts, * 1 hdc in next 3 sts, 2 hdc in next st; rep from * 4 times, 1 sc in next 3 sts – 26 sts.
- R14: 1 sc in next 3 sts, * 1 hdc in next 4 sts, 2 hdc in next st; rep from * 4 times, 1 sc in next 3 sts – 30 sts.
- R15: 1 sc in next 3 sts, * 1 hdc in next 5 sts, 2 hdc in next st; rep from * 4 times, 1 sc in next 3 sts – 34 sts.
- R16: 1 sc in next 3 sts, * 1 hdc in next 6 sts, 2 hdc in next st; rep from * 4 times, 1 sc in next 3 sts – 38 sc.
- R17 – 25: Sc in each st around – 38 sc.
- Work 2 more sc. This is going to be your new starting point.
- R26: 1 sc in each 3 sts, * 1 hdc in next 6 sts, sc2tog; rep from * 4 times, 1 sc in next 3 sts – 34 sts.
- Rnd 27: 1 sc in each 3 sts, * 1 hdc in next 5 sts, sc2tog; rep from * 4 times, 1 sc in next 3 sts – 30 sts.
- R28: 1 sc in each 3 sts, * 1 hdc in next 4 sts, sc2tog; rep from * 4 times, 1 sc in next 3 sts – 26 sts.
- R29: 1 sc in each 3 sts, * 1 hdc in next 3 sts, sc2tog; rep from * 4 times, 1 sc in next 3 sts – 22 sts.
- Begin stuffing and continue until piece is complete.
- R30: Sc2tog, 1 sc in next 18 sts, sc2tog – 20 sc.
- R31: 1 sc in next 9 sts, 2 sc in next 4 sts, 1 sc in next 7 sts – 24 sc.
- R32 – 33: 1 sc in each st around – 24 sc.
- R34: * 1 sc in next 2 sts, sc2tog; rep from * around – 18 sc.
- R35: 1 sc in next 4 sts, * 1 sc in next st, sc2tog; rep from * twice, * sc2tog, 1 sc in next st; rep from * twice, 1 sc in next 2 sts – 14 sc.
- R36: 1 sc in next 5 sts, sc2tog 4 times, sc in next st – 10 sts.
- R37: * sc in next 3 sts, sc2tog rep from * twice – 8 sc.
- R38: * sc in next 2 sts, sc2tog rep from * twice – 6 sc.
- R39: Sc in each st around – 6 sc.
- Fasten off, leaving a long strand. Thread tail through top of sts of last rnd. Pull tail to close opening and knot securely.
Shell:
- With B
- R1: Ch 19, 1 sc in the 2nd ch from the hook, sc in the next 17 sts – 18 sc; Turn.
- R2: Ch 1, sc in next 2 sts, 2 sc in next st; rep from three times, 2 sc in next st, sc in next 2 sts; rep from three times – 24 sc; Turn.
- R3: Ch 1, 2 sc in next st, sc in next 3 sts; rep from three times, sc in next 3 sts, 2 sc in next st; rep from three times – 30 sc; Turn.
- R4: Ch 1, 2 sc in first st, sc in next 28 sts, 2 sc in next st – 32 sc; Turn.
- R5: Ch 1, sc in first st, work in back loop, sc in next 3 sts, 1 hdc in next 24 sts, 1 sc in next 3 sts; work in both loops, sc in last st – 32 sts; Turn.
- R6 – 14: rep Rnd 5 – 32 sts; Turn.
- R15: Ch 1, work in back loop, sc2tog, sc in next 28 sc, sc2tog – 30 sc; Turn.
- R16: Ch 1, work in both loops, sc in each st along – 30 sc; Turn.
- R17: Ch 1, * sc2tog, sc in next 3 sts; rep from * three times, * sc in next 3 sts, sc2tog; rep from * three times – 24 sc; Turn.
- R18: Ch 1, * sc in next 2 sts, sc2tog; rep from * three times, * sc2tog, sc in next 2 sts; rep from * three times ¬– 18 sc; Turn.
- R19: Ch 1, sc in each st along – 18 sc; Turn.
- R20: Ch 1, * sc in next 7 sts, sc2tog; rep from * twice – 16 sc; Turn.
- R21: Ch 1, * sc in next 6 sts, sc2tog; rep from * twice – 14 sc.
- Fasten off, leaving a long strand for sewing Shell to Body.
Ears x2:
- With A
- Ch 8, sl st in 2nd ch from the hook, sl st in next ch, sc in next ch, hdc in next ch, dc in next 3 chs, sl st in last ch – 8 sts.
- Fasten off, leaving a long strand for sewing Ears to Body.
Legs x4:
- With A, make a ring.
- R1: Work 6 sc in a ring.
- R2: * sc in next st, 2 sc in next st; rep from * three times – 9 sc.
- R3 – 4: sc in each st around – 9 sc.
- Fasten off, leaving a long strand for sewing Legs to Body. Stuff Legs.
Finishing:
- With A, sew Ears to top of Head between Rnds 29 and 28.
- With black embroidery thread, embroider eyes between Rnds 30 and 32.
- With B, sew Shell’s edge to Body.
- With A, sew Legs to bottom of Body. Sew Front Legs between Rnds 23 and 26, and Back Legs between Rnds 14 and 17.
- With C, embroider short vertical lines on the last round of Body to create Nose.
- Weave in ends.
Additional Tips:
- For a more realistic look, you can vary the color of the shell segments.
- Use a smaller hook for tighter stitches and a more detailed appearance.
- Experiment with different stuffing materials to achieve the desired firmness.
- Consider adding wire to the legs for poseability.
I hope this pattern helps you create a cute and cuddly armadillo. Remember, crochet is a creative process. Don’t be afraid to experiment and have fun! In addition, you can refer to many other crochet patterns from Fanycrafts at the All Crochet Patterns blog.
Conclusion
Congratulations! You’ve completed your own armadillo crochet pattern. This adorable creature will be a fantastic addition to your amigurumi collection, and there’s so much room to personalize it. Try different colors or add accessories to make it truly one-of-a-kind!