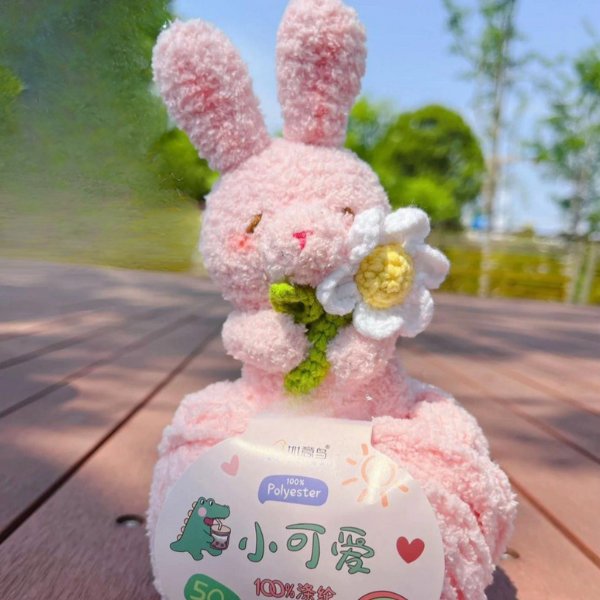
Are you ready to dive into the delightful world of crochet and create a charming, fluffy rabbit? Crochet is a wonderful craft that combines creativity with relaxation, and making a fluffy rabbit crochet pattern can be a rewarding project for crafters of all skill levels. In this guide, we will take you step-by-step through the process, from gathering your materials to adding those final fluffy touches.
How to create Fluffy Rabbit Crochet Pattern
Very happy to share with you how to create a cute and adorable Fluffy Rabbit Crochet Pattern. Fanycrafts hopes, you will like it and if you find it interesting, please share this article with your friends because it means a lot to us.
Materials Needed
Before we start, let’s gather all the supplies you’ll need:
- Yarn Selection: Choosing the right yarn is crucial for your fluffy rabbit. Opt for a soft, plush yarn in the color of your choice. Acrylic or polyester yarns work well for a fluffy effect.
- Crochet Hooks: A 3.5mm to 4mm crochet hook is ideal for this project. The size may vary depending on the thickness of your yarn.
- Additional Supplies: You’ll also need a yarn needle for weaving in ends, stuffing for your rabbit, safety eyes, and a stitch marker.
For a fluffy rabbit, you’ll want a yarn that’s soft and plush. Here are some popular choices:
- Bernat Baby Blanket Yarn: Known for its softness and fluffiness.
- Lion Brand Hometown USA: Offers a variety of colors and textures.
- Any other bulky or super bulky yarn: The thicker the yarn, the fluffier your rabbit will be.
Your hook size should match your yarn’s weight. A larger hook will create a looser, fluffier stitch.
Basic Stitches
You’ll mainly use these stitches:
- Magic Ring: To start your pieces.
- Single Crochet (SC): For most of the body parts.
- Increasing/Decreasing: To shape the pieces.
- Slip Stitch (sl st): For joining and finishing.
Abbreviations:
- MR: Magic Ring
- SC: Single Crochet
- inc: Increase (2 SC in one stitch)
- dec: Decrease (SC2tog)
- sl st: Slip Stitch
Chart Instructions
In this guide, we’ll walk you through each step of making your very own fluffy rabbit crochet pattern. Whether you’re a beginner or an experienced crocheter, you’ll find this pattern easy to follow and enjoyable to make.
Let’s start with the head, the most defining part of your fluffy rabbit.
Head:
- R1: MR6x
- R2: 6v
- R3: 6(x, v)
- R4: 6(x, v, x)
- R5: 6(3x, v)
- R6: 6(2x, v, 2x)
- R7-12: 36x
- R13: 6(4x, a)
- R14: 6(3x, a)
- R15: 6(2x, a)
Body + Leg:
- R1: MR 6x
- R2: 6v
- R3-4: 12x pin 1 cuts wool, pin 2 does not cut wool, hook 2CH to connect to pins 1, 12x, 2x
- R6-7: 28x
- R8: Decrease 1 stitch on each side
- R9: Reduce 1 stitch on each side
- R10: 24x
- R11: 4(4x, a)
- R12: Decrease 1 stitch on each side
Ears:
- R1: MR 6x
- R2: 6v
- R3-6: 12v
- R7: 3(2x, a)
- R8: 9x
Nose:
- R1: MR 6x
- R2: 3(x, v)
- R3: 9x
Hand: R1-7: 6x
Flower branches: R1-7: 5x
Leaves: 5CH, insert needle into stitch 2 from hook needle X, X, TW, T, X, X
Chrysanthemum:
- R1: MR 6x
- R2: 6v
- R3: 12x
- R4: BLO 12x
- R5: 6a
- Hook the petal to R4 – [(4CH), (2F, 4CH)] repeat 6 times
Enjoy your crochet project! In addition, you can refer to many other crochet patterns from Fanycrafts at the All Crochet Patterns blog.
Conclusion
Creating a fluffy rabbit crochet pattern is a delightful project that combines creativity and skill. By following these steps, you’ll have a cuddly companion to cherish. So grab your crochet hook and yarn, and start crafting your fluffy rabbit today!

