Do you want to own an adorable corgi made from crocheted wool? Follow this tutorial and follow the chart, you will definitely succeed. Creating a fat corgi crochet pattern is a delightful project for any crochet enthusiast. This guide will walk you through each step to ensure your crochet project is both enjoyable and straightforward.
How to create Fat Corgi Crochet Pattern

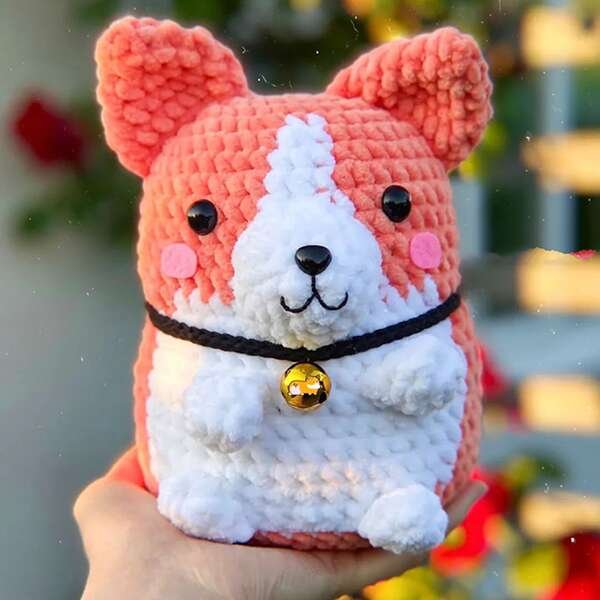
This adorable pattern creates a chubby and cuddly amigurumi corgi with a short body and stubby legs. Learning to read crochet patterns will make your project easier and more enjoyable.
Skill Level: Beginner (requires knowledge of basic amigurumi techniques)
Materials
Before you start, gather the following materials:
- Yarn: orange, white, and black.
- Crochet hook: The size will depend on your yarn choice.
- Scissors: For cutting yarn.
- Stitch markers: To keep track of your rounds.
- Tapestry needle: For weaving in ends.
- Stuffing: To fill your corgi.
- Safety eyes: For the eyes of the corgi.
- Embroidery thread: For the nose and mouth.
Stitches:
- Magic ring (mr)
- Single crochet (sc)
- Increase (inc) – 2 single crochets in the same stitch
- Decrease (dec) – crochet two single crochets together
- Chain (ch)
- Slip stitch (sl st)
Notes:
- Use a smaller hook size for tighter stitches and a firmer amigurumi.
- You can adjust the size of your corgi by using a different yarn weight or hook size.
- This pattern creates a rounder body shape for the “fat” corgi effect.
See more crochet pattern: Long-eared Rabbit Wearing Hat Crochet Pattern
Choosing the right yarn
Selecting the right yarn is crucial for this project. You’ll want something that is soft but holds its shape well.
Types of Yarn Suitable for Amigurumi:
- Cotton yarn: Provides a firm texture.
- Acrylic yarn: Offers good structure and is easy to clean.
Recommended Yarn Colors for the Corgi:
- Orange: For the body.
- White: For the chest, paws, and tip of the tail.
- Black: For the eyes and nose.
Chart Instructions
Head + Body:
- R1: make with orange color, MR 8 sc (8)
- R2: 8 inc (16)
- R3: (1 sc, 1 inc)*8 (24)
- R4: (3 sc, 1 inc)*6 (30)
- R5: make with orange color, 2 sc, 1 inc, (4 sc, 1 inc)2, 1 sc; change to white color, 2 sc; change to orange color, 1 sc, 1 inc, (4 sc, 1 inc)2, 2 sc (36)
- R6: make with orange color, (5 sc, 1 inc)2, 5 sc; change to white color, v, 1 sc; change to orange color, 4 sc, 1 inc, (5 sc, 1 inc)2 (42)
- R7-8: make with orange color, 19 sc; change to white color, 3 sc; change to orange color, 20 sc (42)
- R9-10: make with orange color, 19 sc; change to white color, 4 sc; change to orange color, 19 sc (42)
- R11: make with orange color, 18 sc; change to white color, 6 sc; change to orange color, 18 sc (42)
- R12: make with orange color, 18 sc; change to white color, 7 sc; change to orange color, 17 sc (42)
- R13: make with orange color, (1 sc, 1 inc)3, 9 sc; change to white color, 13 sc; change to orange color, 8 sc, (1 sc, 1 inc)3 (48)
- R14: make with orange color, (2 sc, 1 inc)2, 4 sc, (2 sc, 1 dec), 2 sc; change to white color, 1 dec, 14 sc; change to orange color, 1 dec, 2 sc, 1 dec, 4 sc, (2 sc, 1 inc)2 (48)
- R15: make with orange color, 17 sc; change to white color, 15 sc; change to orange color, 16 sc (48)
- R16-20: make with orange color, 17 sc; change to white color, 16 sc; change to orange color, 15 sc (48)
- R21: make with orange color, 3 sc, 1 dec, (6 sc, 1 dec), 4 sc; change to white color, 2 sc, 1 dec, 6 sc, 1 dec, 3 sc; change to orange color, 3 sc, 1 dec, (6 sc, 1 dec), 3 sc (42)
- R22: make with orange color, 16 sc; change to white color, 12 sc; change to orange color, 14 sc (42)
- Continue crocheting with orange thread.
- R23: BLO, 42 sc (42)
- R24: (5 sc, 1 dec)*6 (36)
- R25: (4 sc, 1 dec)*6 (30)
Filling:
- R26: (3 sc, 1 dec)*6 (24)
- R27: (2 sc, 1 dec)*6 (18)
- R28: (1 sc, 1 dec)*6 (12)
- R29: 6 dec (6)
- Fasten off and weave in end.
- Install eyes between R9 and R10.
Leg x2 (make with white color):
- R1: MR 7 sc
- R2-3: 7 sc (7)
- Leave long stitches between R16 and R17 and R22 and R23 of the body.
Ear x2 (make with orange color):
- R1: MR 4 sc
- R2: 4 inc (8)
- R3: (1 sc, 1 inc)*4 (12)
- R4: (2 sc, 1 inc)*4 (16)
- R5-6: 16 sc
- Leave a long thread and sew it between R3 and R7 of the head.
Collar (make with black color): Repeat crocheting multiple ch until the collar is the right size. Beginning with the second to last stitch, crochet sc all over.
Nose (make with white color):
- R1: MR 6 sc
- R2: 6 inc (12)
- R3: (1 sc, 1 inc)*6 (18)
- R4: 18 sc
- Filling. Leave a long thread and sew it between R9 and R14 of the head.
Tail (make with orange color):
- R1: MR 6 sc
- R2: 6 inc (12)
- R3: (1 sc, 1 inc)*6 (18)
- Sew to the body between R18 and R21.
This pattern allows you to create a cute fat corgi. Enjoy your crochet project! In addition, you can refer to many other crochet patterns from Fanycrafts at the All Crochet Patterns blog.
Conclusion
Creating a fat corgi crochet pattern is a fun and charming project. By following these steps, you can craft a delightful and functional piece that adds a touch of handmade charm to your collection. Don’t be afraid to experiment with different designs and customizations to make it truly your own.