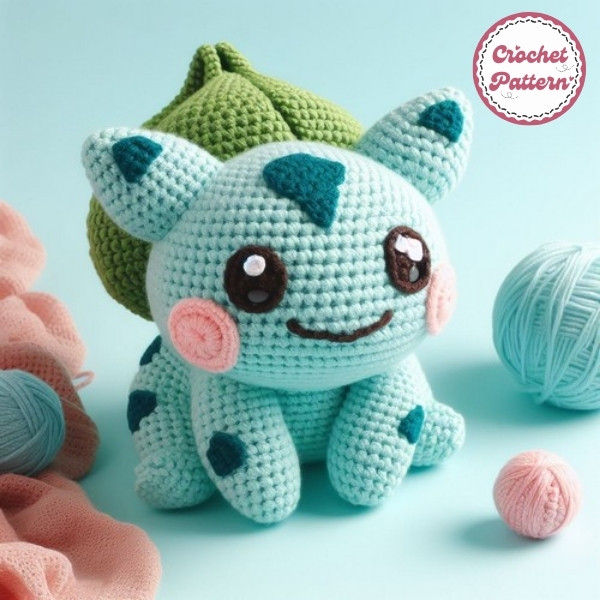
Crocheting a Bulbasaur is not just about replicating a character—it’s a chance to bring a piece of the Pokémon world to life in your hands! In this detailed guide, we’ll take you through each step of creating a Bulbasaur crochet pattern, from understanding the materials to finishing touches that will make your Bulbasaur look stunning. Whether you’re a beginner or experienced crocheter, this article of Fanycrafts will offer tips and tricks to enhance your project.
Introduction to Crocheting Bulbasaur

Who wouldn’t want to crochet their very own Bulbasaur? Bulbasaur is one of the most beloved starter Pokémon, known for its cute, dinosaur-like body and iconic bulb on its back. Creating a crochet version of Bulbasaur not only makes for a great collectible but also an excellent gift for any Pokémon fan. Plus, it’s a fun project that can help you improve your crochet skills!
Bulbasaur is an ideal Pokémon for crocheters because its structure is relatively simple yet fun to work with. Its round body and distinct features like the bulb make it a great choice for adding different textures and details. Also, Bulbasaur’s design is adaptable, allowing you to personalize it with your color choices or added accessories.
Though this project may seem complicated at first glance, it’s perfect for intermediate-level crocheters. Beginners can also give it a try by carefully following the steps, as we’ll break it down into manageable sections.
How to create Bulbasaur Crochet Pattern

Before you start crocheting your Bulbasaur, gather all your materials. The key to success lies in using the right yarn and tools. This is a basic outline for a Bulbasaur crochet pattern. You may need to adjust the stitch counts and sizes based on your desired finish.
For an accurate Bulbasaur, you’ll want to use yarn that matches his color scheme. Here’s what you’ll need:
- Main body: Light teal or light green yarn
- Bulb: Green for the bulb’s base and a lighter shade for detail
- Details: Black, white, and pink yarn for the eyes, mouth, and spots.
Materials
- Yarn
- Parfait Chunky (Super Bulky 6) in color “Rain“- 2 skeins
- Honey Bunny (Super Bulky 6) in color “Shamrock” – 1 skein
- Any worsted weight yarn (Medium 4) in a similar color to “Rain” < 1 skein
- Felt
- Dark Green Felt
- White Felt
- Red Felt
- Embroidery Thread
- Dark Green Embroidery Thread
- White Embroidery Thread
- Red Embroidery Thread
- Embroidery Needle
- Weaving/Yarn Needle
- 4mm Crochet Hook
- Sewing Pins
- Scissors
- Stitch Markers
- Polyester Stuffing
A 3.5mm crochet hook works best for this project, but you can adjust depending on how tight or loose you want your stitches. If you crochet tightly, consider going up a size.
Other Necessary Tools:
- Stitch marker: To keep track of your rounds
- Tapestry needle: For sewing parts together
- Polyester stuffing: To give your Bulbasaur its shape
- Safety eyes: If you prefer them over crocheting the eyes
Abbreviations
Knowing basic crochet terms is crucial, especially if you’re working from a pattern. Here are a few key stitches you’ll use:
- ch = chain
- mr = magic ring
- sc = single crochet
- inc = single crochet increase
- dec = invisible decrease
- rnd = round
- slst = slip stitch
- st(s) = stitch(es)
- FLO = front loop only
- BLO = back loop only
- FO = fasten off
- sc3inc = single crochet 3 increase
Once you get familiar with these, following the pattern will be a breeze.
Explore more crochet pattern: Cute Little Mushroom Crochet Pattern
Bulbasaur Crochet Pattern Chart Instructions

Use parfait chunky in color “Rain“. Crochet in continuous rounds and make 2.
Arms:
- R1: mr 12 (12)
- R2: (sc, inc) x6 (18)
- R3: [BLO: sc around] (18)
- R4: sc around (18)
- R5: (sc 5, inc) x3 (21)
- R6-9: sc around (21) 4 Rounds
- FO, leaving a long tail for sewing. Stuff the arms and set aside.
Body:
- R1: mr 12 (12)
- R2: (sc, inc) x6 (18)
- R3: sc, inc, (sc 2, inc) x5, sc (24)
- R4: (sc 3, inc) x6 (30)
- R5: sc 2, inc, (sc 4, inc) x5, sc 2 (36)
- R6: (sc 5, inc) x6 (42)
- R7: sc 3, inc, (sc 6, inc) x5, sc 3 (48)
- R8: (sc 7, inc) x6 (54)
- R9: sc 4, inc, (sc 8, inc) x5, sc 4 (60)
- R10-13: sc around (60) 4 rounds
- R14: sc 22 on body, sc 16 on arm 1, skip 5 sts on arm 1 & body, sc 6 on body, sc 16 on arm 2, skip 5 sts on arm 2 & body, sc 22 on body (82)
- R15: (sc 4, dec) x6, sc 10, (sc 4, dec) x6 (70)
- R16: sc around (70)
- R17: (sc 5, dec) x10 (60)
- Start stuffing the body and continue stuffing as you go. Make sure to continue to stuff the arms too, if necessary.
- R18: sc around (60)
- R19: (sc 3, dec) x12 (48)
- R20: sc around (48)
- R21: sc 3, dec, (sc 6, dec) x5, sc 3 (42)
- R22: sc around (42)
- Make a slst & FO, leaving a long tail for sewing.
Thighs:
- R1: mr 12 (12)
- R2: (sc, inc) x6 (18)
- R3: sc, inc, (sc 2, inc) x5, sc (24)
- R4-6: sc around (24) 3 Rounds
- Make a slst & FO, leaving a long tail for sewing.
Legs:
- R1: mr 12 (12)
- R2: (sc, inc) x6 (18)
- R3: sc, inc, (sc 2, inc) x5, sc (24)
- R4: [BLO: sc around] (24)
- R5: sc 6, dec x6, sc 6 (18)
- R6-8: sc around (18) 3 Rounds
- Make a slst & FO, leaving a long tail for sewing.
Ears:
- R1: mr 6 (6)
- R2: sc around (6)
- R3: inc x6 (12)
- R4: sc around (12)
- R5: (sc, inc) x6 (18)
- R6: sc around (18)
- R7: sc, inc, (sc 2, inc) x5, sc (24)
- Make a slst & FO, leaving a long tail for sewing.
Head:
- R1: mr 12 (12)
- R2: (sc, inc) x6 (18)
- R3: sc, inc, (sc 2, inc) x5, sc (24)
- R4: (sc 3, inc) x6 (30)
- R5: sc 2, inc, (sc 4, inc) x5, sc 2 (36)
- R6: (sc 5, inc) x6 (42)
- R7: sc 3, inc, (sc 6, inc) x5, sc 3 (48)
- R8: (sc 7, inc) x6 (54)
- R9: sc 4, inc, (sc 8, inc) x5, sc 4 (60)
- R10: (sc 9, inc) x6 (66)
- R11-13: sc around (66) 3 ROUNDS
- R14: sc 11, (sc, inc) x6, sc 20, (inc, sc) x6, sc 11 (78)
- R15: sc around (78)
- R16: sc 11, (sc 2, inc) x6, sc 20, (inc, sc 2) x6, sc 11 (90)
- R17: sc 4, dec, (sc 8, dec) x8, sc 4 (81)
- R18: sc 36, [FLO: inc x9], sc 36 (90)
- R19-21: sc around (90) 3 ROUNDS
- R22: sc 4, dec, (sc 8, dec) x8, sc 4 (81)
- R23: (sc 7, dec) x9 (72)
- R24: sc 5, dec, (sc 10, dec) x5, sc 5 (66)
- R25: (sc 9, dec) x6 (60)
- R26: sc 4, dec, (sc 8, dec) x5, sc 4 (54)
- R27: (sc 7, dec) x6 (48)
- R28: sc 3, dec, (sc 6, dec) x5, sc 3 (42)
- R29: (sc 5, dec) x6 (36)
- R30: sc 2, dec, (sc 4, dec) x5, sc 2 (30)
- Start stuffing and continue stuffing as you go.
- R31: (sc 3, dec) x6 (24)
- R32: sc, dec, (sc 2, dec) x5, sc (18)
- R33: (sc, dec) x6 (12)
- R34: dec x6 (6)
- Close off the head & FO, leaving a long tail to weave in.
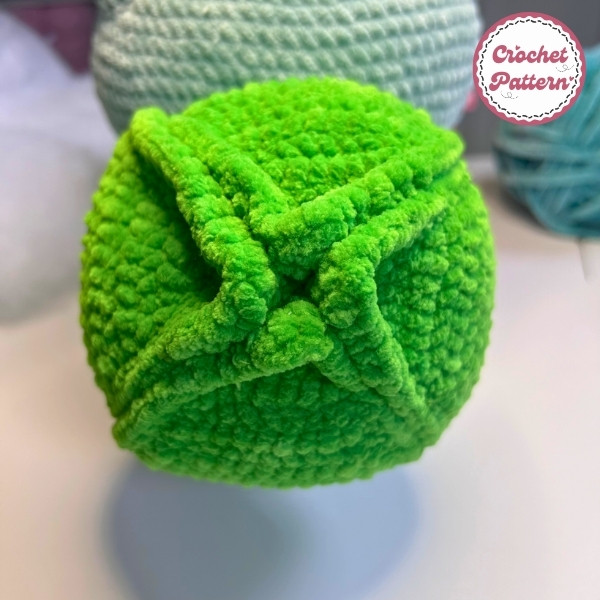
Let’s sculpt the face. Please note: This shaping method works best with chenille yarn. If you’re using a different type, you might need to adjust the technique. To shape the face, you’ll need a weaving needle and worsted weight yarn that matches Bulbasaur or Ivysaur’s skin tone. Follow these steps:
Bulb: (Use Honey Bunny in color “Shamrock”)
- R1: mr 12 (12)
- R2: (sc, inc) x6 (18)
- R3: sc, inc, (sc 2, inc) x5, sc (24)
- R4: (sc 3, inc) x6 (30)
- R5: sc 2, inc, (sc 4, inc) x5, sc 2 (36)
- R6: (sc 5, inc) x6 (42)
- R7: sc 3, inc, (sc 6, inc) x5, sc 3 (48)
- R8: (sc 7, inc) x6 (54)
- R9-11: sc around (54) 3 ROUNDS
- R12: (sc 7, dec) x6 (48)
- R13: sc around (48)
- R14: sc 3, dec, (sc 6, dec) x5, sc 3 (42)
- R15: sc around (42)
- R16: (sc 5, dec) x6 (36)
- R17: sc around (36)
- R18: sc 2, dec, (sc 4, dec) x5, sc 2 (30)
- R19: sc around (30)
- R20: (sc 3, dec) x6 (24)
- Start stuffing and stuff as you go.
- R21: sc, dec, (sc 2, dec) x5, sc (18)
- R22: (sc, dec) x6 (12)
- R23: dec x6 (6)
- FO, leaving a long tail to weave in.
Bulb Petals: (Use Honey Bunny in color “Shamrock”)
- Ch 11 and start row 1 in the 2nd ch from hook.
- R1: sc 10, ch 1, turn (10)
- R2: inc, sc 8, inc, ch 1, turn (12)
- R3: sc 12, ch 1, turn (12)
- R4: inc, sc 11, ch 1, turn (13)
- R5: inc, sc 12, ch 1, turn (14)
- R6-12: sc 14, ch 1, turn (14) 7 ROWS
- R13: dec, sc 12, ch 1, turn (13)
- R14: dec, sc 11, ch 1, turn (12)
- R15: dec, sc 10, ch 1, turn (11)
- R16: dec, sc 9, ch 1, turn (10)
- R17: dec, sc 8, ch 1, turn (9)
- R18: dec, sc 7, ch 1, turn (8)
- R19: dec, sc 6, ch 1, turn (7)
- R20: dec, sc 5, ch 1, turn (6)
- R21: dec, sc 2, dec, ch 1, turn (4)
- R22: dec x2, ch 1, turn (2)
- R23: dec (1)
- Continue to crochet around the entire edge of the leaf. When you make your way back to the last st of row 23, make a slst and FO. Leave a long tail to securely weave in.
Assembly:
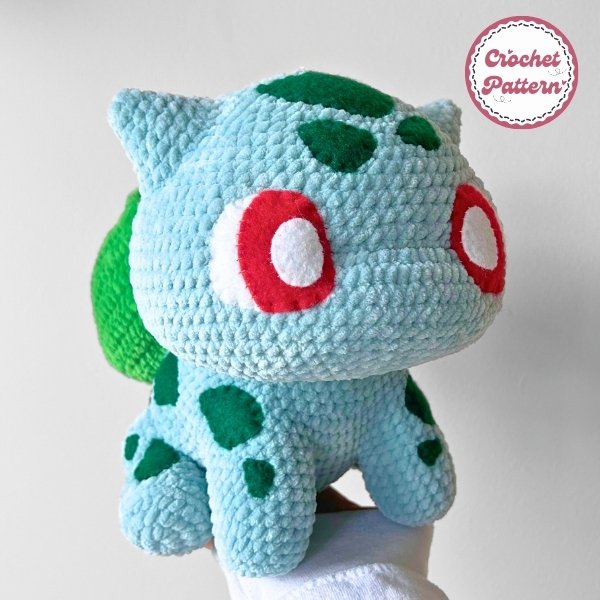
- Cut out and embroider your felt eyes. For Ivysaur, you will want to use red, white, and black felt. For Bulbasaur, only use red and white felt. Using matching embroidery thread with an embroidery needle, sew the eyes together and then onto the face!
- Sew the bottom of the (4) Bulb Petals onto the Bulb around rnd 4 of the Bulb.
- Sew the top of the Bulb Petals onto the Bulb – where you sew these on depends if you’re crocheting Ivysaur or Bulbasuar. Sew them higher up for Bulbasaur and lower for Ivysaur.
- Sew the Head onto the Body. Make sure this step hides the yarn tails from when we shaped the face! Add additional stuffing to the neck area to ensure there’s enough support to keep the head up.
- Sew the Ears onto the Head from rnds 7-14. Make sure to stuff them prior to sewing them all the way on.
- Sew the Thighs onto the Body so that they’re flush with the bottom of the body, ensuring he will sit correctly on a flat surface. Make sure to stuff them prior to sewing them all the way on.
- Sew the Legs onto the Thighs & Body so that they’re flush with the bottom of the body, ensuring he will sit correctly on a flat surface. Make sure to stuff them prior to sewing them all the way on.
- Sew the Bulb onto the back of the Body, ensuring it’s centered. For Bulbasaur’s Bulb you will need to use a separate strand of ‘Shamrock’ colored yarn. For Ivysaur’s Bulb, you will want to use your ‘Almond Butter’ yarn tail from the Trunk. Stuff the Trunk a little prior to sewing it all the way on.
- Cut out a bunch (~14) of random shapes with felt (Dark Green for Bulbasaur, and Dark Teal for Ivysaur). Reference a photo of these characters while you cut these out for a more accurate depiction! Use matching embroidery thread and an embroidery needle to sew them onto the body!
Enjoy your crochet project! In addition, you can refer to many other crochet patterns from Fanycrafts at the All Crochet Patterns blog.
Conclusion
Feel free to get creative! Try using different yarn colors to make a shiny Bulbasaur, or add fun accessories like a little scarf. By following this step-by-step guide, you’ll have your very own Bulbasaur crocheted in no time! Whether it’s your first time crocheting a Pokémon or you’re adding to your collection, this Bulbasaur will surely be a hit.

