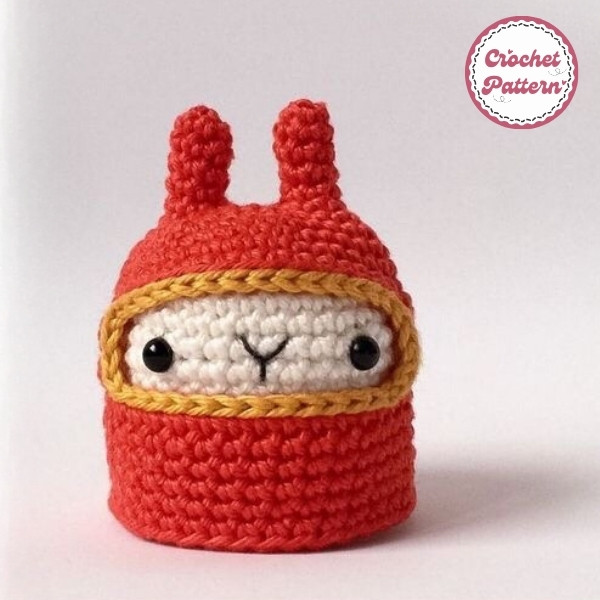
Creating a Ninja Bunny crochet pattern can be a delightful project for any crochet enthusiast. This cute, stealthy little character blends the charm of bunnies with a touch of ninja flair, perfect for gifting or personal use. In this article, we’ll cover everything you need to know to crochet your very own Ninja Bunny, from tools and materials to step-by-step instructions and helpful tips. Let’s dive in with Fanycrafts!
How to create Ninja Bunny Crochet Pattern
Crocheting a Ninja Bunny is a fun, creative way to blend the whimsy of a bunny with the intrigue of a stealthy ninja. This project is great for crochet lovers who want to make something unique, adorable, and a bit daring. Whether you’re making this Ninja Bunny for a child, a friend, or just to add to your collection, this step-by-step guide will walk you through the entire process.
Before starting, gather these materials to ensure a smooth workflow:
- Yarn: Choose a soft acrylic or cotton yarn. Black or dark colors work well for the “ninja” vibe, with contrasting colors for the mask and accessories.
- Crochet Hook: A 3.5mm to 4.0mm hook is ideal for medium-weight yarn, but adjust according to your yarn weight.
- Safety Eyes: 6mm or 8mm for the perfect cute, wide-eyed look.
- Stuffing: Fiberfill or any soft stuffing for shaping.
- Tapestry Needle: For sewing parts together.
- Scissors: Always have a good pair on hand for clean cuts.
To make this Ninja Bunny, you’ll need to know the following stitches and techniques:
- Magic Ring
- Single Crochet (SC)
- Increase (INC) and Decrease (DEC)
- Slip Stitch (SL ST)
- Chain Stitch (CH)
If you’re new to these, consider watching a few tutorials online for a refresher.
Explore more crochet: Rabbit Carrying Bag Crochet Pattern
Chart Instructions Ninja Bunny Crochet Pattern
Start with the body, which serves as the base structure, use white wool:
- R1: MR 6x (6)
- R2: 6v (12)
- R3: 6(x, v) (18)
- R4: 6(2x, v) (24)
- R5: 6(3x, v) (30)
- R6: 6(4x, v) (36)
- R7-17: 36x
- Attach 2 plastic eyes to rows 9 – 10, 2 eyes apart
- R18: BLO 6(4x, a) (30)
- R19: 6(2x, a) (24)
- R20: 6(2x, a) (18)
- R21: 6(x, a) (12)
- R22: 6a (6)
- Thread pin
Clothes:
- Hook from ear down
- R1: MR 6x (6)
- R2-5: 6x
- Hook the second ear similar to the first ear but do not cut the yarn up to 3 jars connected to the first ear.
- R6: 6x – ear 1, 3x – 3 bing, 6x – ear 2, 3x – 3 bing (18)
- R7: 2(T, x, 2x same leg, 2x, (x, T) same leg, 2F, 2F same leg) (24)
- R8: 6(3x, v) (30)
- R9: 6(4x, v) (36)
- R10-11: 36x
- R12: 26x, rotate
- R13-15: 1 pin, 22x, rotate
- R16: 1 pin, 22x, up to 14x
- R17: Attach the thread to R16: x, 21x, 14x (36)
- R18-22: 36x
- R23: 12x, thread pin
Finish the product by connecting the yellow yarn to the border: Sl into 14 rows of R16, 4sl to the end of the row, 14sl – BLO, 4sl to the end of the row (36). Then lock the yarn, cut the yarn.
If you’re new to crocheting, don’t rush! Enjoy the process and experiment with different colors. Want to make it unique? Try different color combinations or add a little hat or belt! Display it as part of your amigurumi collection, or use it as a fun, quirky gift!
Remember, crochet is a creative process. Don’t be afraid to experiment and have fun! In addition, you can refer to many other crochet patterns from Fanycrafts at the All Crochet Patterns blog.
Conclusion
Congratulations on completing your Ninja Bunny Crochet Pattern! This adorable crochet project combines a bit of ninja mystery with bunny cuteness, resulting in a unique addition to any collection. Keep experimenting with other crochet patterns and enjoy every stitch along the way!

