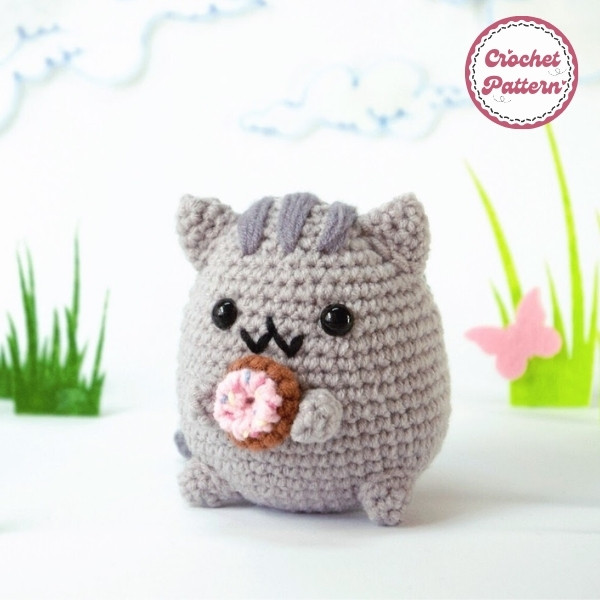
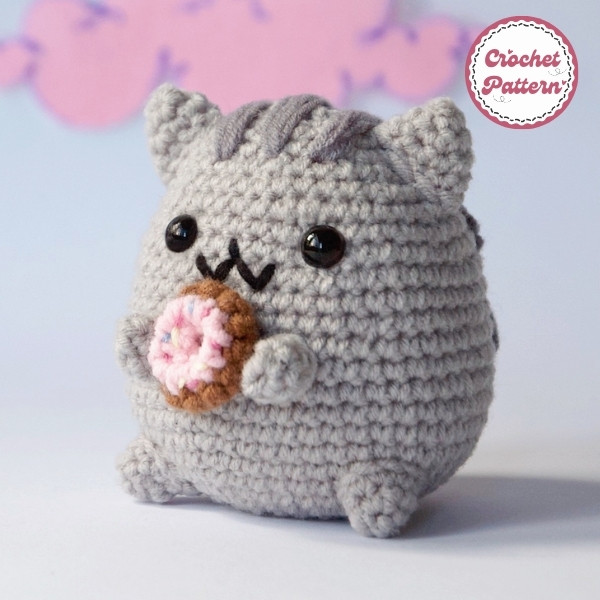
Creating a Pusheen holding a donut is an adorable crochet project that can be fun for fans of the lovable cat character. This project brings together Pusheen’s cute features and adds a playful touch with a sweet donut accessory. Let’s walk through how to crochet your own Pusheen with a donut!
How to create Pusheen with Donut Crochet Pattern

Pusheen, the beloved chubby gray cat, is a popular character known for her cute and simple design. Adding a donut to Pusheen’s paws makes this crochet project even more adorable! Whether you’re a fan of Pusheen or just love amigurumi projects, this step-by-step guide will help you crochet your very own Pusheen with a donut.
If you are new to crocheting and don’t want to buy everything separately, i recommend to get a crochet Starter Kit with the main tools.
- Yarn in the colors: Light grey, dark grey, brown, rosé
- Yarn strength: 50 gr/133m, DK, light worsted yarn, number 3
- Embroidery thread: black for nose/mouth. Pink, blue and yellow for donut-sprinkles.
- Embroidery needle, yarn needle -> i recommend get them in several sizes, with a blunt tip (so you don’t split the yarn). You will need them very often in amigurumi: the bigger ones for sewing your pieces together and the smaller ones are perfect for embroidery or sewing smaller pieces.
- Safety eyes: size 8 or 9 -> i recommend to get them in a set with different sizes
- Crochet Hook: size 4/2.5 mm -> my go to and absolute favourite crochet hooks are these Japanese Tulip Etimo Rose crochet hooks. I use them all the time!
Here are the essential stitches for this project:
- Magic Circle (mc): Used to start most round crochet pieces, allowing you to pull tight and close the center.
- Single Crochet (sc): The primary stitch for shaping Pusheen and the donut.
- Increase and Decrease Stitches: These are used to shape the body, ears, and donut by adding or reducing stitches in the round.
See more crochet: The Color Octopus Crochet Pattern
Step-by-Step Instructions for Pusheen
Body (With light grey yarn beginning at the head):
- R1: 6 sc in magic ring (6)
- R2: 2 sc in each stitch around (12)
- R3: (1 sc, inc) x6 (18)
- R4: (2 sc, inc) x6 (24)
- R5: (sc in next 3 st, inc) x6 (30)
- R6: (sc in next 4 st, inc) x6 (36)
- R7: (sc in next 5 st, inc) x6 (42)
- R8: sc in each st (42)
- R9: (sc in next 6 st, inc) x6 (48)
- R10-21: (12 rounds) sc in each st (48)
- R22: (sc in next 6 st, invdec*) x6 (42)
- R23: sc in each st (42)
- R24: (sc in next 5 st, invdec) x6 (36)
- R25: sc in each st (36)
- R26: (sc in next 4 st, invdec) x6 (30)
- R27: (sc in next 3 st, invdec) x6 (24)
- Add safety eyes size 8 or 9 between row 19 and 20, about 6 stitches apart. Stuff the body.
- R28: (sc in next 2 st, invdec) x6 (18)
- R29: (sc in next st, invdec) x6 (12)
- R30: invdec all around (6)
- To close the body go with a sewing needle in the outer loops only (from the inside out) and pull tight.
Ears x2:
- R1: 4 sc in magic ring (4)
- R2: (1 sc, inc) x2 (6)
- R3: (1 sc, inc) x3 (9)
- R4: Sc in each st around (9)
- Tie off, leave a piece of yarn to sew the ears to the head. Sew ears to the head. Leave enough space between them for the three stripes.
Arms x2:
- R1: 6 sc in magic ring (6)
- R2-3: sc all around (6)
- Tie off, leaving a yarn end for sewing on the body later. We first have to sew on the donut.
Legs x2:
- R1: 6 sc in magic ring (6)
- R2: (1 sc, inc) x3 (9)
- R3: Sc all around (9)
- Tie off, leaving a yarn end for sewing to the body. Sew the feet onto the body.
Tail:
- The tail is dark grey/light grey striped. We start with dark grey yarn.
- R1: 6 sc in magic ring (6)
- R2-3: sc all around (6)
- Switch to light grey yarn.
- R4-6: 6 sc around (6)
- Switch back to dark grey yarn.
- R7-9: 6 sc around
- Switch back to light grey yarn.
- R10-12: 6 sc around
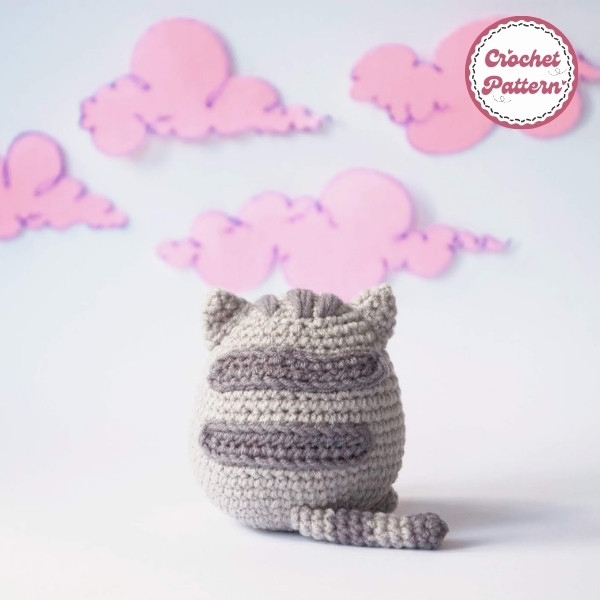
- Tie off leaving a yarn end and sew the tail onto the body so that it goes to one side. See picture.

Stripes on back x2 (With dark grey yarn ch 15):
- R1: sc in second chain from hook and in next 13 stitches, at the end of the row, chain 1 (14)
- R2: turn and continue to sc 14 on other side of the chain (14)
Slipstitch in next stitch. - Tie off leaving a yarn end for sewing onto the back. Sew both stripes on the back with a little distance between them as you can see in the picture above.
Stripes on head x3: Take a long peace of dark grey yarn. Take the yarn double, and stitch three long stitches across the head. Go over each stitch two times. Tie off, hide yarn.
Nose: With black embroidery floss sew on mouth and nose the way you see it in the picture.

Donut:
The free pattern for the donut by genuinemudpie is not available anymore, but you can google tiny donut crochet pattern for a substitute. Now sew the donut to the body, then sew on the hands directly next to it. Congrats! You now have created a pusheen with donut!
Enjoy your crochet project! In addition, you can refer to many other crochet patterns from Fanycrafts at the All Crochet Patterns blog.
Conclusion
Creating a Pusheen with a donut is an adorable and satisfying crochet project that’s perfect for Pusheen fans or anyone who enjoys making cute amigurumi. By following this guide, you can crochet your own cuddly version of Pusheen holding her sweet treat.
