Creating a dinosaur Olaf crochet pattern is a delightful and rewarding project for crochet enthusiasts. Whether you’re a beginner or an experienced crocheter, this project combines creativity with skill to bring a whimsical character to life. In this guide, we’ll walk you through the process step by step, ensuring you have all the information you need to create your very own Dinosaur Olaf.
How to create Dinosaur Olaf Crochet Pattern

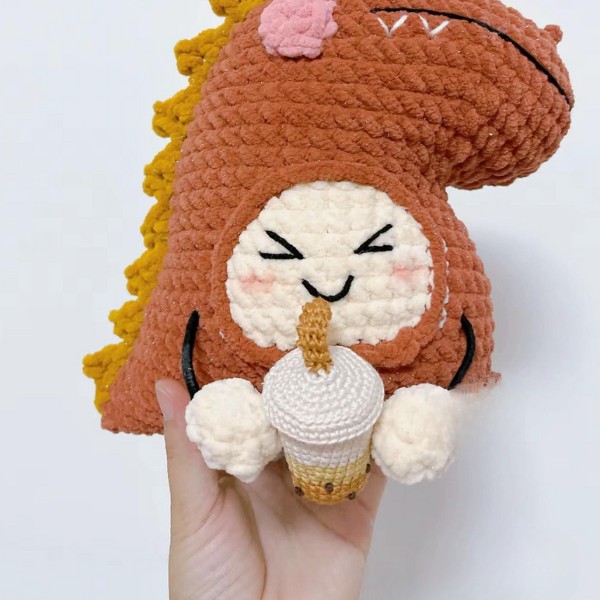
Imagine a quirky mash-up of a dinosaur and Olaf, the beloved snowman from Disney’s Frozen. This adorable hybrid combines the playful charm of Olaf with the prehistoric appeal of a dinosaur, making it a fun and unique crochet project. The Dinosaur Olaf is perfect for fans of Frozen and anyone who loves dinosaurs. It’s a great gift for children or a whimsical addition to your collection.
Crocheting is a relaxing and creative hobby that allows you to make personalized items with love and care. Unlike mass-produced toys, a handmade crochet Dinosaur Olaf carries a personal touch, making it unique and special. Additionally, crochet is highly versatile, allowing you to customize the pattern to suit your preferences, whether through color choices or adding unique embellishments.
Materials Needed
Dinosaur Olaf Crochet Pattern creates a cute and cuddly dinosaur plushie named Olaf. It’s perfect for beginners with basic crochet knowledge.
Before you dive into the crochet world, it’s essential to have the right materials. Here’s what you’ll need to get started:
- Yarn: Choose a medium-weight yarn in your preferred colors. A green or teal color works well for a dinosaur, but feel free to get creative!
- Crochet Hook: A size G/4.0 mm hook is recommended for this project, but you can adjust based on your yarn choice.
- Stuffing: Use polyester fiberfill to give your dinosaur its shape.
- Safety Eyes: These add a realistic touch to your creation.
- Tapestry Needle: For sewing parts together and weaving in ends.
- Scissors: A sharp pair for cutting yarn.
Tips on Selecting the Right Yarn and Hook Size
When selecting yarn, consider its texture and color. A soft yarn will make your dinosaur cuddly, while vibrant colors will make it eye-catching. The hook size should match the yarn’s thickness to ensure the stitches are tight enough to hold the stuffing but not so tight that it’s difficult to work with.
Notes:
- You can adjust the size of your Olaf by using a different yarn weight or hook size.
- Be sure to maintain consistent tension throughout crocheting.
- Feel free to add stripes using mint yarn for Olaf’s body.
Understanding the Pattern
Crochet patterns can seem like a foreign language if you’re not familiar with the terminology. Common abbreviations include:
- ch: chain
- sc: single crochet
- inc: increase (two single crochets in one stitch)
- dec: decrease (single crochet two stitches together)
You’ll need to know a few basic stitches to complete this project:
- Chain Stitch (ch): The foundation of most crochet projects.
- Single Crochet (sc): A tight, dense stitch that forms the bulk of amigurumi.
- Increase (inc) and Decrease (dec): Techniques to shape your piece.
Tips for Beginners
A comfortable and well-lit workspace will make your crochet experience more enjoyable. Ensure you have a chair with good back support and keep your materials within easy reach.
- Practice Basic Stitches: Spend some time practicing the stitches mentioned above before starting the project.
- Watch Tutorials: Online video tutorials can provide additional guidance and visual support.
- Take Breaks: Avoid hand fatigue by taking regular breaks.
Explore more crochet pattern: Kitty Donuts Crochet Pattern
Chart Instructions
Note:
- Dragon eyes + scales can be hooked and sewn onto the body or you can find a suitable position and hook it straight onto the body.
- The olaf side can be crocheted on 1 side or 2 sides depending on preference
- Use stitches on both sides to create a nose
- The black arm uses zinc wrapped in black wool
- M stitch: 3 single stitches reduced to 1
Eyes x2:
- Up 7ch from ch2 hook (x, T), (3F), (T, x)*2
Hands x2:
- R1: MR 6x
- R2-3: 6x
Legs x2: MR BO (corn tip 5F)
Blush x2: R1: MR 8x
Body:
- R1: Up 13ch, from ch2 hook v, 10x, (4x), 10x, v (28)
- R2: 2v, 10x, 4v, 10x, 2v (36)
- R3: 14x, (x,v)*4, 14x (40)
- R4: v, 13x, (x,v,x)*4, 13x, v (46)
- R5: v, 44x, v (48)
- R6: 48x
- R7: v, 46x, v (50)
- R8: 13x, (2x,a,2x)*4, 13x (46)
- R9: v, 12x, (x,a,x)*5, 12x, v (43)
- R10: 14x, (x,a)2, M, (a,x)2, 14x (37)
- R11: v, 11x, 3a, x, 3a, 11x, v (33)
- R12: 16x, v, 16x (34)
- R13: 8x, [White Blonde 5x], 3x, 2v, 3x [White Blonde 5x), 8x (36)
- R14: v, 6x, [White 7x], 3x, 2v, 3x, [white 7x), 6x, v (40)
- R15: 7x, [white 9x], 3x, 2v, 3x, [white 9x), 7x (42)
- R16: 6x, [white 11x), 8x, [white 11x), 6x (42)
- R17: v, 5x, [white 11x], 3x, 2v, 3x [white 11x], 5x, v (46)
- R18: 7x, [white 11x), 10x, [white 11x), 7x (46)
- R19: v, 6x, [white 11x), 10x, [white 11x), 6x, v (48)
- R20: 9x, [9x white), 12x [9x white), 9x (48)
- R21: 9x, Blo 9x, 12x, Blo 9x, 9x (48)
- R22: v, 46x, v (50)
- R23: v, 18x, (x,a,x)*3, 18x, v (49)
- R24: v, 19x, (x,a)*3, 19x, v (48)
- R25: v, 17x, 6a, 17x, v (44)
- R26: v, 19x, 3a, 19x, v (45)
- R27: Leave the wool at the edge to sew the outer yarn
Milk tea cup:
- R1: Mr6x (6)
- R2: 6v (12)
- R3: (x,v)*6 (18)
- R4: (x,v,x)*6 (24)
- R5: Blo 24x
- R6-7: 24x
- R8: changes color 24x
- R9: (7x,v)*3 (27)
- R10-11: 27x
- R12: change color (8x,v)*3 (30)
- R13-14:30x
- R15: (9x,v)*3 (33)
- R16:33x
- R17: (10x,v)*3 (36)
- R18: 36x (Use brown wool to embroider round beads to make pearls)
- R19: Blo (2x,a,2x)*6 (30)
- R20: (3x,a)*6 (24)
- R21: (x,a,x)*6 (18)
- R22: (x,a)*6 (12)
- R23: 6a (6)
Straw:
- R1: MR 6x (6)
- R2-6: 6x
Milk tea lid:
- R1: Mr6x (6)
- R2: 6v (12)
- R3: (x,v)*6 (18)
- R4: (x,v,x)*6 (24)
- R5: (3x,v)*6 (30)
- R6: (2x,v,2x)*6 (36)
- R7: blo 36x
- R8: 36x (Sew the straw on and then attach it to the mouth of the cup)
Avoid harsh chemicals that can damage yarn fibers. Regularly fluff the stuffing to maintain its shape. Enjoy your crochet project! In addition, you can refer to many other crochet patterns from Fanycrafts at the All Crochet Patterns blog.
Conclusion
Creating a Dinosaur Olaf crochet pattern is a rewarding project that allows you to express creativity and hone your skills. With patience and practice, you can craft a delightful dinosaur that will bring joy to anyone who sees it. So grab your hooks, choose your colors, and let your imagination run wild!